
1. Burn video to DVD disc/folder/ISO file
2. Create video to Blu-ray disc/folder/ISO file
3. Burn DVD/Blu-ray with various menu templates
4. Edit videos before burning DVD/Blu-ray
5. Make DVD/Blu-ray from various video formats
6. Enables the created DVD / blu ray to be played on different TV standards between NTSC and pal.
7. You can edit subtitles or add SRT, sub, SSA and ass subtitles to create the perfect DVD video on demand
8. Supports Intel, CUDA and AMD acceleration
9. Provides real-time preview effect, so you can easily check and adjust the video effect


Burnova is a DVD manufacturer that can create DVD discs / folders / ISO files from local videos. You can make movies to various types of DVD, such as DVD-R, DVD + R, DVD-RW, DVD + RW, DVD + R DL, DVD-R DL, DVD-5, DVD-9, and play them on any player. In addition, you can use this DVD Converter to burn ISO files or DVD folders to DVD discs, or to make ISO files / DVD folders from various videos.
2. Create video to Blu-ray disc/folder/ISO file
Burnova's goal is to burn movies into Blu ray 25 and Blu ray 50, so you can play them on the Blu ray players of PS3, Sony, LG, Samsung and Philips. It can also record movies to Blu ray folder / ISO files and play them on your portable Blu ray player.
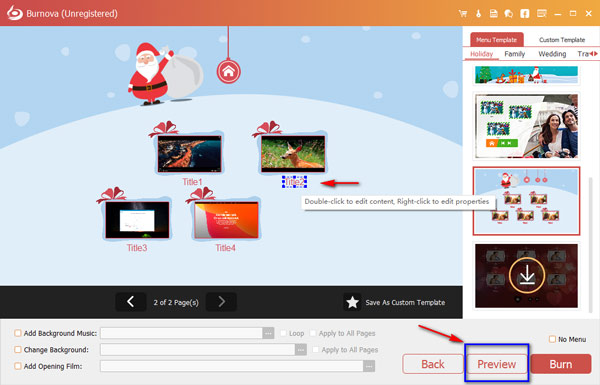
3. Burn DVD/Blu-ray with various menu templates
Burnova provides you with a variety of templates (holiday, family, travel, wedding and more styles) to specify your different types of movies or videos. You can also add your own image as the background to tell your own story in the video. For titles, menus, and play buttons, you can edit or drag the buttons to where you want them to be. For opening movies, you can import your favorite video clips.
4. Edit videos before burning DVD/Blu-ray
You can edit the video with the built-in editor before recording it to DVD or Blu ray disc. For horizontal video taken by an iPad or iPhone camera, you can rotate or flip it. For those unwanted videos, cut it out. Movies with annoying mailbox? Crops. You can adjust the brightness and contrast of the video to get the ideal video, watermark the video to give you the mark. For blur, sharpen, gray, sketch, canvas, mirror, sculpture, relief and pixel effects, you can also achieve special video effects in video with burnova. What's powerful is that burnova is able to save DVD projects for further burning.
5. Make DVD/Blu-ray from various video formats
Burnova is compatible with almost all DVD / blu ray video formats. You can import videos from MP4, avi, WMV, MKV, m4v, MOV, M2TS / MTS, 3gp, VOB, flv, MPEG, mpg, DV, RMVB, Tod, ASF, and even HD MPEG2, HD MPEG4, HD WMV, HD ts, HD MTS, HD Trp, HD TP video files. It allows you to add external audio tracks from MP3, AAC, AIFF, FLAC, WAV, wma, OGG, AC3, MPA, MP2, etc. to make your own video.
Part 1. How to burn videos to DVD or Blu-ray disc/folder/ISO file
Step 1. Insert a blank DVD or Blu-ray disc to the DVD drive if you want to burn videos into DVD disc.
Step 2. Click "Add Media File(s)" to add one or more video files to this software.
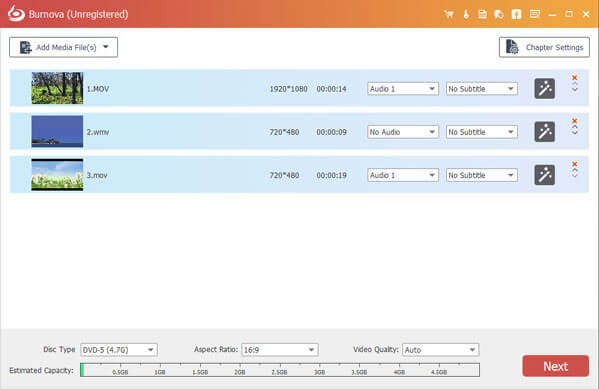
Step 3. Click the edit button in the main interface to edit videos.
Step 4. Choose Disc Type in the bottom-left corner to make sure what type of DVD or Blu-ray disc you want to burn video into. Click "Next" to edit DVD menu.
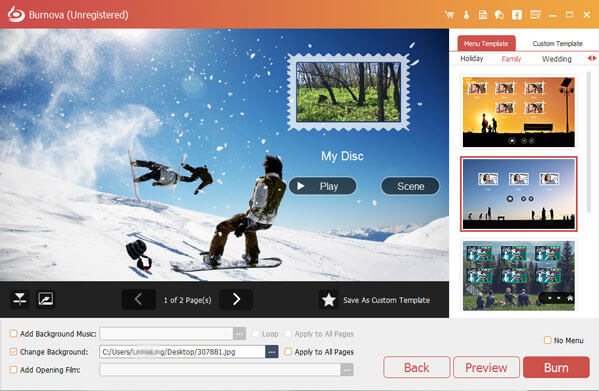
Step 5. When you enter in the menu editing interface, choose a menu template for your DVD. You can click the "Preview" button to preview your DVD.
In the Preview interface, click the "Play" button to make all videos play in order.
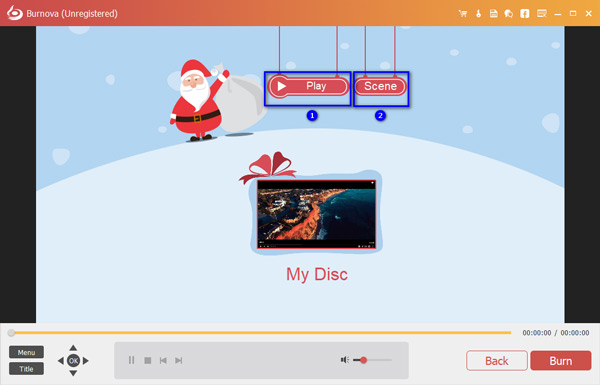
If you want to play videos at random, click the "Scene" button to view your videos. Then, choose and click the one you want to play.
.jpg)
Step 6. Click "Burn" to get the DVD/BD burning settings
Here you can make the DVD settings as the following:
• Select create video to DVD disc or DVD folder/ISO file.
• Choose the TV standard as NTSC or PAL.
• Play the DVD file from the first title or menu.
• Loop all titles or not.
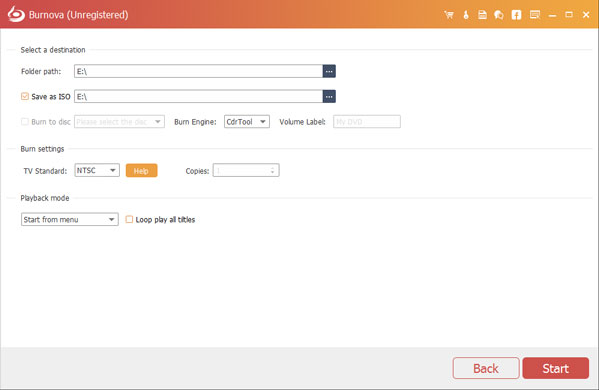
Step 7. After making all settings, click "Start" to burn your videos to DVD/BD.
Part 2. How to edit video effects before burning
Before you make the movies or videos to DVD, you are allowed to edit your video effects freely to animate your videos.
Step 1. Click the "Edit" button to enter the editing interface.
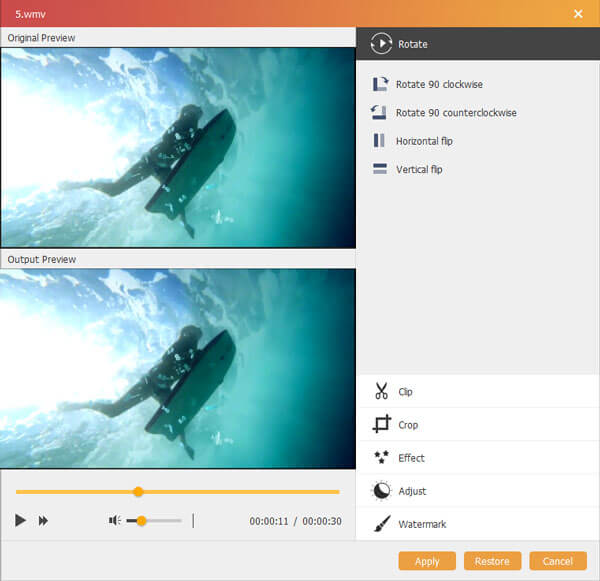
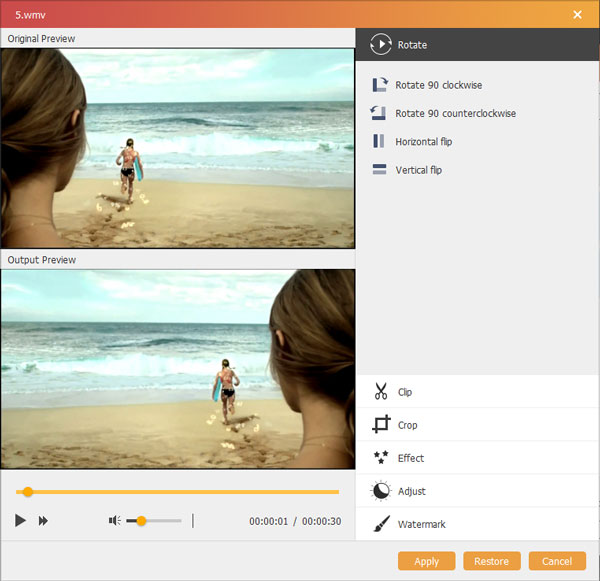
Step 2. Rotate or flip video
Click "Rotate" to rotate video in 90 clockwise or 90 counterclockwise or flip horizontally or vertically.
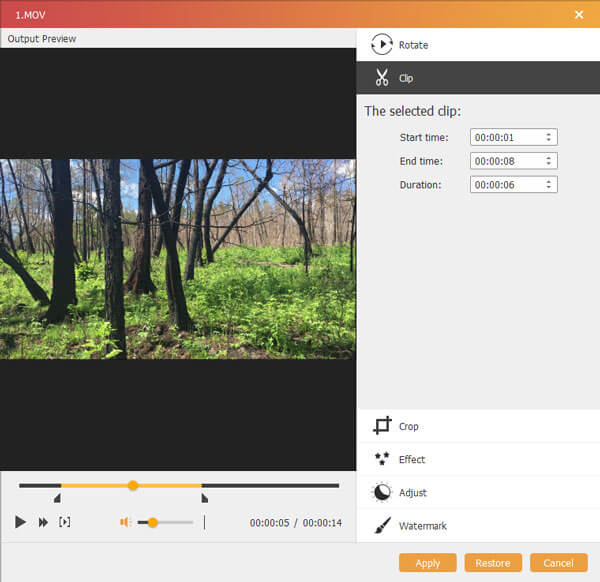
Step 3. Clip video
Click "Clip" to drag the bar automatically or set the start time and end time to cut the unwanted video parts.
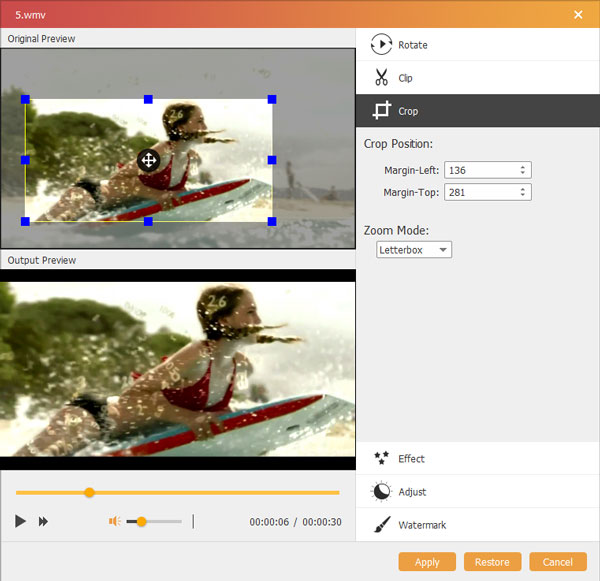
Step 4. Crop video
Click "Crop" to select the zoom mode as "Letterbox", "Center", "Pan & Scan" or "Full" to get rid of the unwanted edges or capture the wanted parts.
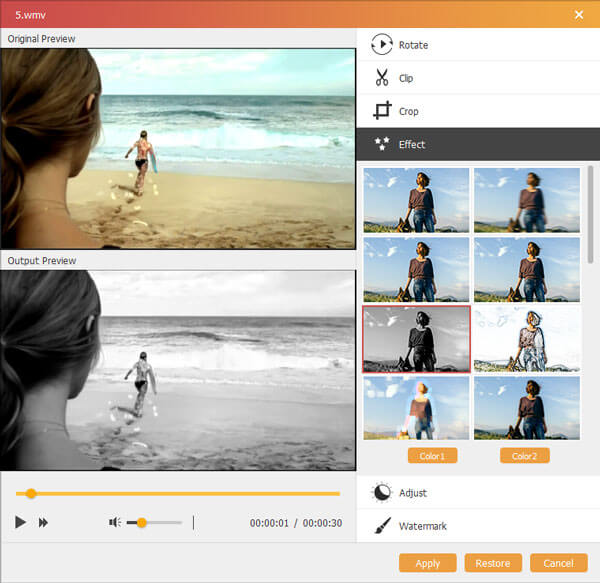
Step 5. Change effects
Click "Effect" to color for your videos. Here you can edit video effects like photos as Blur, Sharpen, Frame, Gray, Sketch, Color Pencil, Erode, Pixelate, Noise, Sculpture, Emboss, Smooth, Canvas, Mirror, Material, Wave, etc. Check this page to know more about special video effects.
Step 6. Adjust video
If you do not like the brightness or contrast, you can click "Adjsut" to manually adjust the brightness, contrast, saturation, hue and volume.
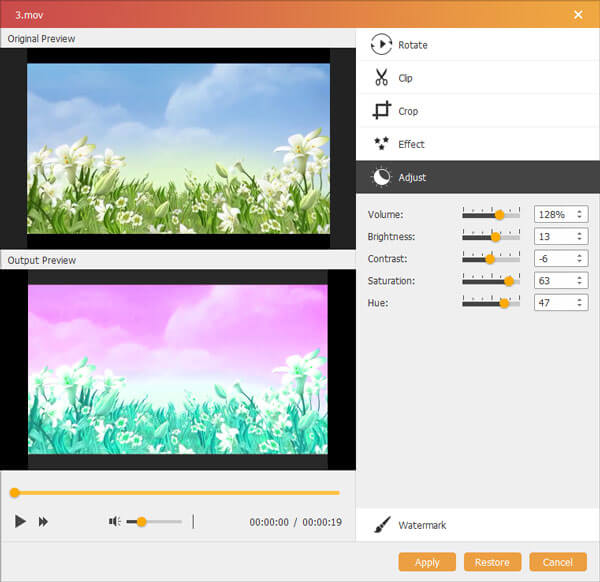
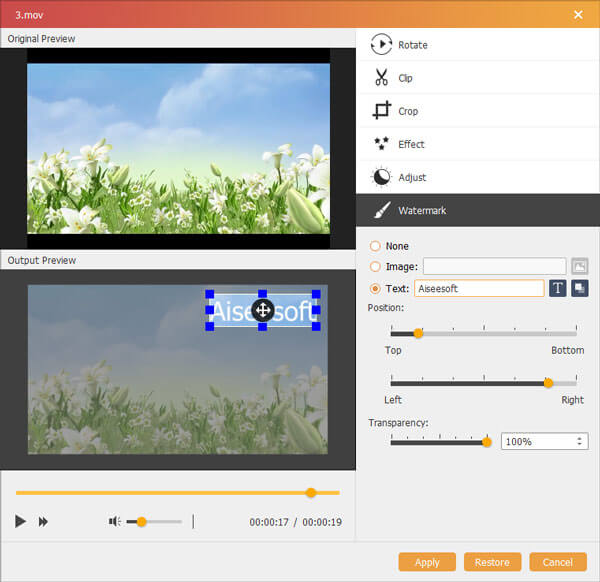
Step 7. Watermark
If you want to add your own mark to the video, you can click "Watermark" to add text or images as the watermark on your video files.
Part 3. How to edit menu before burning
After editing your videos, you could edit the menu for burning.
Step 1. Click "Next" to enter the menu editing features.
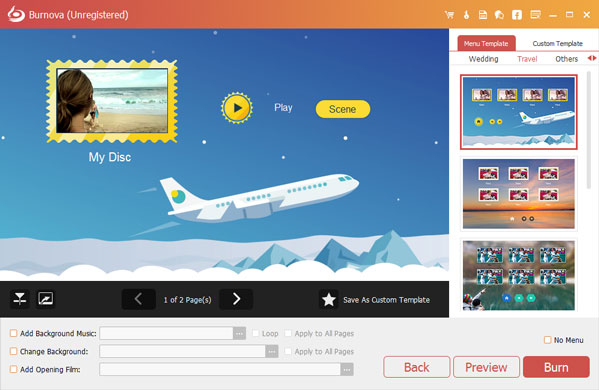
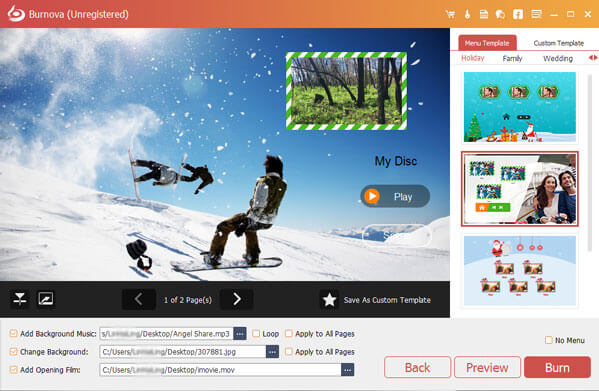
Step 2. Menu templates
Here you can use the default templates of this software, or download from online sites to make the menu background. Moreover, if you do not like those, just click "Change Background" to import your own images or photos as the menu background.
Step 3. Add background music
Checkmark "Add Background Music" to import the audio file. Her e you can set the music as loop or single playing.
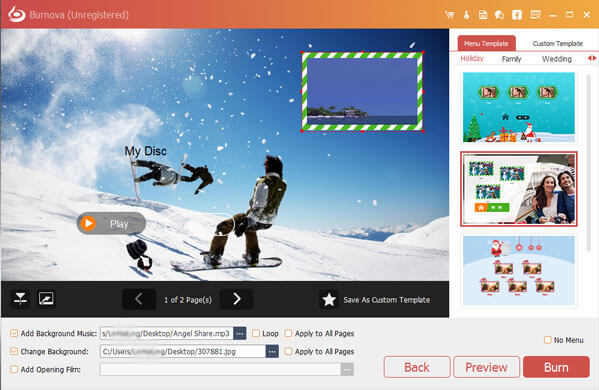
Step 4. Add opening file
Want to make your video more enjoyable? Then add opening film. You can use downloaded or local opening film to make your video more professional.
After you make menu settings successfully, click "Next" to proceed the subsequent steps.
Part 4. More preference settings for Aiseesoft Burnova
The above step guides show you how to use Burnova to burn videos to DVD/Blu-ray. For this software, still some features you cannot miss in this part.
.jpg)
Update
For checking the new feature of this software, you need to make settings to get the update reminder. Click "Menu" > "Preferences" > Tick "Check Updates Automatically".
Transfer various files between iPhone/iPad/iPod/Android and computer or between different...

Support hard disk, recycle bin, U disk, computer, mobile hard disk, SD card, memory card, camera, recorder and other storage devices data recovery...