"I shut down at night when I went to bed, but when I woke up in the morning, I found that my cell phone could not be opened, but how can I fix Android which Won’t Turn on?"
You May Like:
How to Backup and Restore Android Data on Computer
How to Fix Android phone Keeps Turning Off
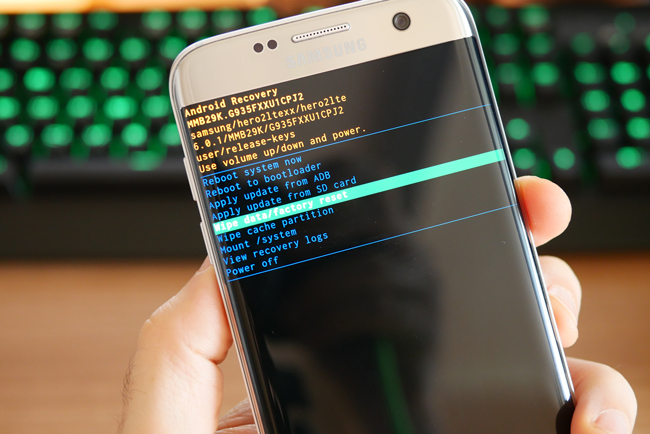
| Part 1: Enter Android Recovery Mode to Turn Mobile Phone on |
| Part 2: Hard Reset Android Phone |
| Part 3: Wipe Cache Partition |
| Part 4: Fix Android which Won’t Turn on with Android Repair |
Step 1 Press and hold the Volume Down + Home + Power buttons until the Samsung logo appears.

Step 2 Press the Volume Down button to choose Reboot System Now, and then press Power button.

Part 2. Hard Reset Android Phone
Step 1 Hold and press Volume Up + Home + Power simultaneously until the Samsung word.

Step 2 Release the button when you see the logo.
Step 3 Use Volume buttons to choose wipe data/factory reset and then press Power button.
Android system creates cache files so that the software or appslications on Android phone can be accessed quickely. But you won't lose any personal data to enter recovery mode and wipe cache partition on your phone.
Below is how to wipe cache partition on Samsung phone.
Step 1 Pressing and holding the Volume Up, Home and Power button together.
Step 2 Leave Power button only when the logo comes up till Recovery screen appears.
Step 3 Use the Volume down button to choose wipe cache partition and press Power button to confirm.

Part 4. Fix Android which Won’t Turn on with Android Repair
Android Repair is a very professional software to repair a phone that doesn't work properly. This software can help you solve the problem that the phone can't boot properly, it can also solve the problems of Black screen of death,Play Store not working,Android won't turn on or off,Apps keep crashing,Android OTA update failed,Stuck in a boot loop,Android system UI not working,Android phone or tablet gets bricked.The Android repair program allows you to fix system issues on most Samsung models, including latest Galaxy S9/S10,A6s,A9s,M10,M30,etc.If you need it, you can download the trial version.
Step 1. Connect your Android device
After launching dr.fone, you can find "Repair" from the main window. Click on it.
.jpg)
Connect your Android phone or tablet to the computer with the correct cable. Click the "Android Repair" among the 3 options.
.jpg)
In the device information screen, select the correct brand, name, model, country/region, and carrier details. Then confirm the warning and click "Next".
.jpg)
The Android repair may erase all data on your device. Type in "000000" to confirm and proceed.
Note: It is highly recommended that you backup your Android data before opting for Android repair.
.jpg)
Step 2. Repair the Android device in Download mode.
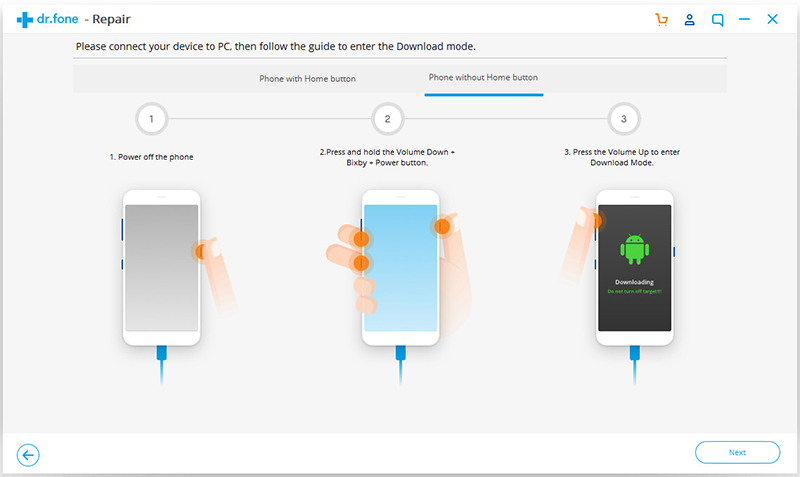
Before Android repair, it is necessary to boot your Android device in Download mode. Follow the steps below to boot your Android phone or tablet in DFU mode.
For a device with Home button:
◆ Power off the phone or tablet.
◆ Press and hold the Volume Down, Home, and Power buttons for 5s to 10s.
◆ Release all the buttons, and press the Volume Up button to enter the Download mode.
.jpg)
For a device with no Home button:
◆ Power off the device.
◆ Press and hold the Volume Down, Bixby, and Power buttons for 5s to 10s.
◆ Release all the buttons, and press the Volume Up button to enter the Download mode.

Then click "Next". The program starts downloading the firmware.
.jpg)
After downloading and verifying the firmware, the program automatically starts repairing your Android device.
.jpg)
In a while, your Android device will have all the system issues fixed.
.jpg)
There are many unexpected surprises in my life. In order to avoid data loss, we must regularly store our important data on the computer.

