● Unlocks a second-hand or other iPhones whose passcodes are unknown.
● Removes the lock screen of a disabled iPhone in easy steps.
● Works for all models of iPhone, iPad and iPod touch.
● Fully compatible with the latest iOS 15.
4 Ways to Bypass iPhone Passcode Easily
1.Launch dr.fone - Unlock on your system. From the welcome screen, select the option of “Unlock” to start the process.
2.Now, using a USB/lightning cable, connect your iPhone to the system and wait for a while as the application will recognize it automatically. Afterward, click on the “Start” button.
3. After detecting your device, it will display a interface where the iPhone DFU mode needs to be activated. Proceed by following the instructions.
4. Provide correct information related to your phone’s model, firmware version, and more in the new window. Make sure that you have provided the right information before clicking the “Download” button.
5. The application will automatically download the related firmware update for your device. It might take a while to complete the download. Afterward, click on the “Unlock Now” button.
6. Type in the confirmation code from the on-screen instruction to initiate the process.
7.Once it is completed successfully, you will be notified with the following message. If you are not happy with the results, then you can click on the “Try Again” button to repeat the process.
Your device will be like brand new and you would be able to perform iPhone or iPad disabled fix without iTunes as well.
It might surprise you, but one can also resolve the iPhone screen disabled issue with Siri as well. Though the solution can only work with devices running on iOS 8.0 to iOS 11. Additionally, it was originally speculated as a loophole in iOS. Therefore, you might have to put a lot of effort in order to fix the iPhone disabled problem using this technique. Though, this won’t erase your device’s data and you would be able to surpass the passcode initially. In order to perform iPhone or iPad disabled fix without iTunes, follow these stepwise instructions.
1.To start with, hold the Home button on your device to activate Siri and ask for the present time, by saying something like “Hey Siri, what time is it?” or anything else that would display the clock. Tap on the Clock icon to commence the process.
2.Visit the World Clock interface and choose to add another clock.
3.The interface will ask you to search a city. Simply type anything you want and tap on the “Select all” option.
4.Afterward, you can see various options like cut, copy, define, etc. Tap on the “Share” option.
5.This will open another window, listing various options related to sharing. Tap on the Message icon to continue.
6.Type anything in the “To” field and tap the return button on the keyboard.
7.This will highlight the provided text in green color. Select it and tap on the plus icon.
8.It will open a new window. From here, tap on the “Create new Contact” button.
9.On the Add new contact screen, choose to add a photo and tap on the “Add Photo” option.
10.This will open the Photo Library. From here, you can visit any album.
11.Instead of selecting a picture, just exit the interface by pressing the Home button. This will open the phone’s home screen.
If you are looking for an alternative way to learn how to erase iPhone when locked, then you can also take the assistance of iTunes. It provides a free and simple method to restore your device. Since it would wipe your data, you might end up losing your essential files in the process. We recommend following this technique only when you have taken a backup of your data via iTunes beforehand. To learn how to wipe a locked iPhone with iTunes, follow these steps:
1.Firstly, put your iPhone into recovery mode. To do this, launch an updated version of iTunes on your system and connect it to a lightning cable. Now, long press the Home button on your device and connect it to the other end of the lightning cable. Release the Home button once the iTunes logo would appear.
2.As soon as your phone would be connected, iTunes will recognize an issue with it. From here, you can choose to restore it.
3.If you don’t get the above pop-up on your screen, then simply launch iTunes and visit its “Summary” section. From here, choose to “Restore backup” under the Backup section.
4.Just agree to the pop-up message by clicking on the “Restore” button.
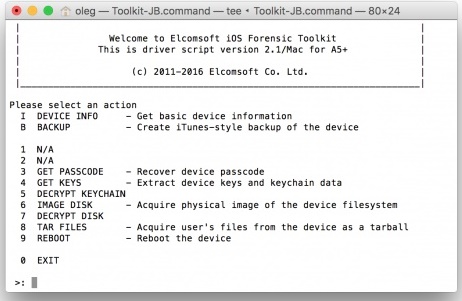
This might be new to you, but there are a few forensic toolkits in the market that can help you perform iPhone bypass without much trouble. One of the most reliable options is the Elcomsoft iOS Forensic Toolkit. Though, in order to use it, you need to download its licensed version from its website right.
Later, you can simply connect your phone to the system and run the forensic tool. From the welcome screen, select the option of “Get Passcode”. This will run an encrypted command and provide a passcode to your phone that can be used to unlock it.

After following these solutions, you would be able to bypass iPhone lock without any trouble. You can simply choose your preferred option and perform iPhone bypass. If you are not able to unlock your phone with Siri, then use dr.fone - Unlock. It is an extremely safe option that is sure to help you bypass iPhone passcode and overcome various iOS related problems.
.jpg)
.jpg)
.jpg)
.jpg)
.jpg)
.jpg)
.jpg)
.jpg)
.jpg)
.jpg)
.jpg)
.jpg)
.jpg)
.jpg)
.jpg)
.jpg)
.jpg)

.jpg)
.jpg)
.jpg)
.jpg)


