Step-by-step guide to uninstall an app from a Samsung/Android phone or tablet
After you have downloaded and installed dr.fone on your PC, you can follow the step-by-step instructions given below to fully uninstall an unwanted app from your Samsung/Android device:
1. On your PC, double-click the dr.fone's shortcut icon to launch the program. Then choose Transfer from the main window.
2. Connect your Samsung/Android phone to the PC using the data cable that shipped along with it.
3. Wait until dr.fone - Transfer (Android) detects your phone and installs the required drivers both on the PC and your mobile phone. Note: This is one-time process and is performed only once when you connect your Samsung/Android smartphone to the PC for the first time after installing dr.fone - Transfer (Android).
4. On your Samsung/Android phone, when prompted for, on the Allow USB debugging box that pops up, tap to check the Always allow this computer and then tap OK to allow your phone to trust the computer it is connected to. Note: Checking the Always allow this computer checkbox ensures that you are not prompted with the same message every time you connect your phone to the PC. However, for security reasons, you should NOT check this checkbox if the PC is used at public places or is not your personal property and is unsecure.
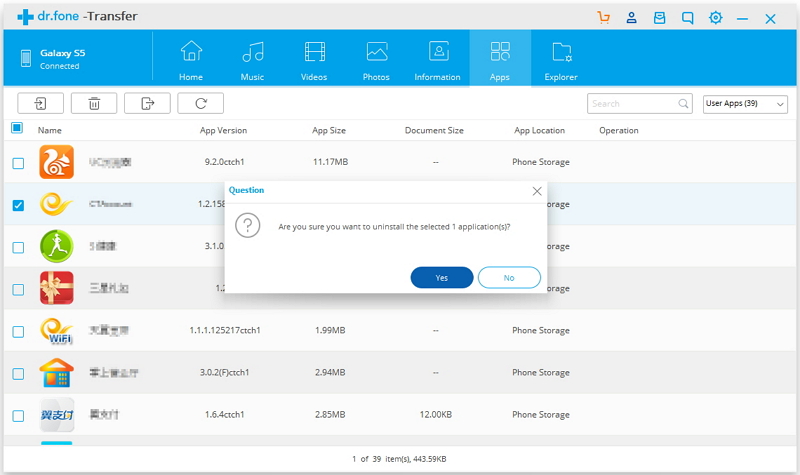
5. Once everything is up and running, on the dr.fone's interface, from the left pane, click to select the Apps category.
6. From the list of installed apps in the center pane, check the checkbox representing the one that you want to remove.
7. From the top of the interface, click Uninstall.
8. On the Question confirmation box, click Yes to provide your consent to let dr.fone - Transfer (Android) uninstall the app from your Samsung/Android phone.
9. Once done, you can close dr.fone, disconnect your phone from the PC and start using it normally.
.jpg)
.jpg)
.jpg)


